eSIM Activation
The following explains how to set up SIM profile on a docomo eSIM card or eSIM via the network in simple steps from a docomo eSIM card or eSIM-compatible device.
- The icons and layout of the operation screen may vary depending on the model and OS version. The images shown are examples.
- If you have performed the eSIM reissue procedure via the docomo Online Shop, ahamo website, or irumo website, you will need to enter the confirmation code (password notified to you by SMS after completing the procedure).
Setting up on dtab and Kids' Keitai
Set up SIM profile from initial settings
Please turn on your purchased device. "SIM profile Settings" will start in the initial settings.
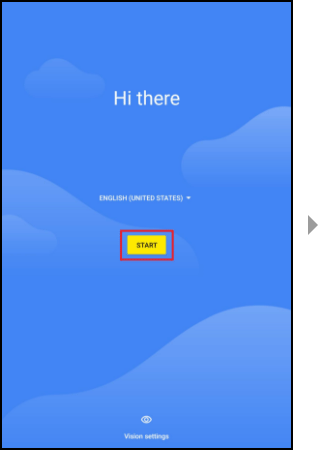
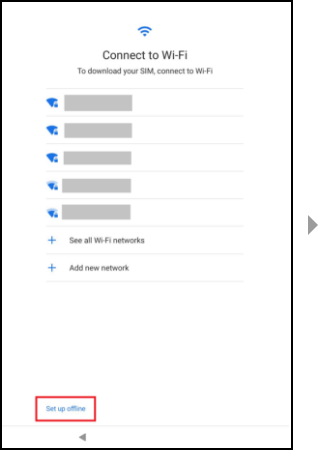
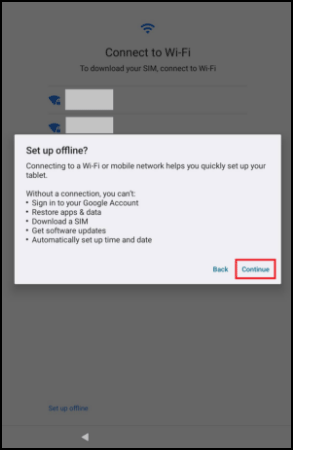
[Getting Started] Language and Wi-Fi settings
Select the language, select "Set up offline" on the Wi-Fi connection screen, and then tap "Continue." SIM profile can be set even if Wi-Fi is not connected.
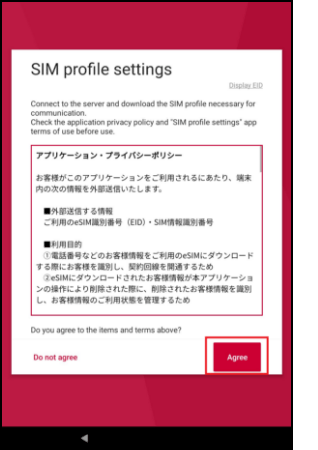
Confirming SIM profile settings
Here to start setting up your SIM profile. Please confirm the Terms of Use and follow the instruction.
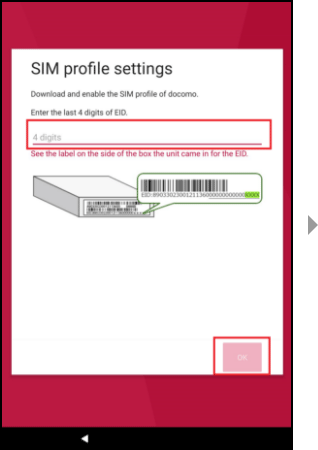
Entering the last 4 digits of EID
Check the EID label on the side of the box that contained the device and enter the last 4 digits of the EID.
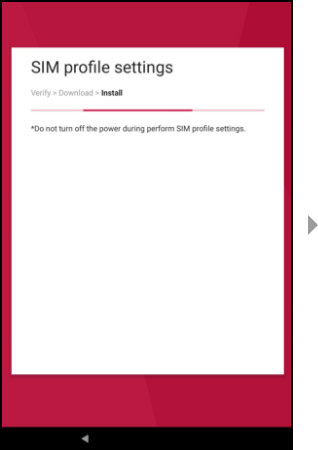
If entered correctly, the SIM profile will be downloaded from the server, and installed.
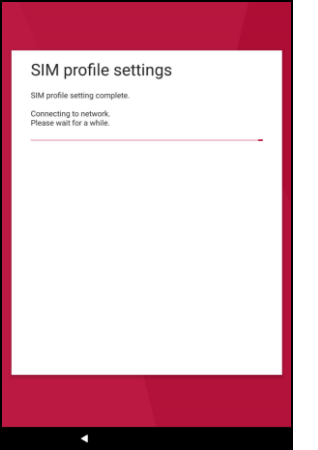
After installation, the SIM profile will be activated and the setting will be completed.
- Do not remove the docomo eSIM card or turn off the power while setting up.
- Click
 here[PDF format:571KB](in Japanese only) for how to check EID on dtab d-51C.
Setting SIM profile from the Settings menu
If the SIM profile setting has not been completed, it can be set from the "SIM profile settings" menu.
You may be required to perform an authentication operation. Please set your unlock screen method in advance.
Settings menu
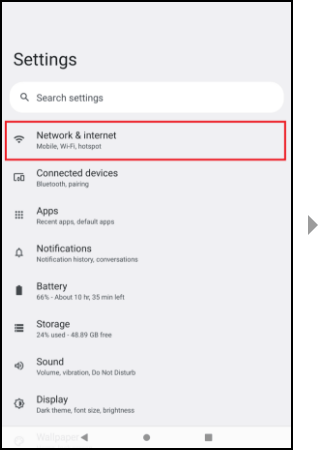
You can set from Home screen > App list > "Settings" > "Network & internet" > "Mobile network."
- The setting menu varies depending on the device model.
- If the screen lock setting screen appears after selecting "Mobile network," follow the on-screen instructions from "To screen lock setting," and then go to the setting menu again.
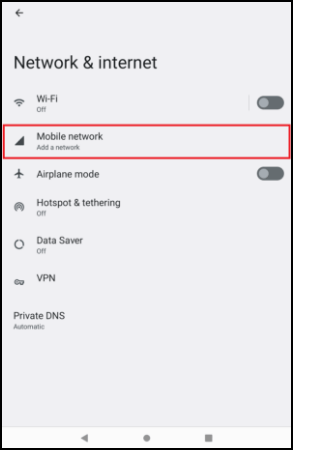
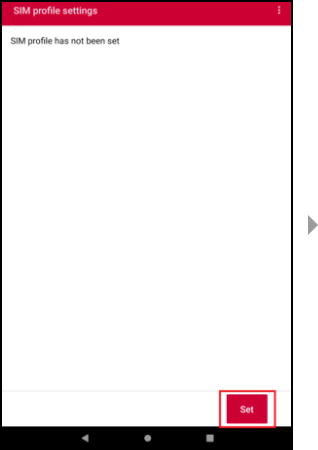
Adding SIM profile
Make the authentication settings and tap "Set" at the bottom of the screen.
- In the authentication settings, you will be asked for the unlock screen method you have set up in advance.
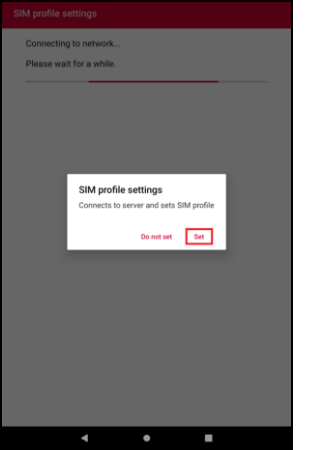
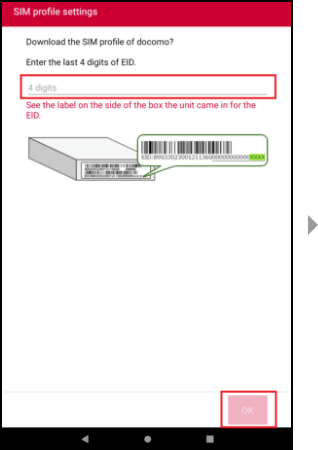
Entering the last 4 digits of EID
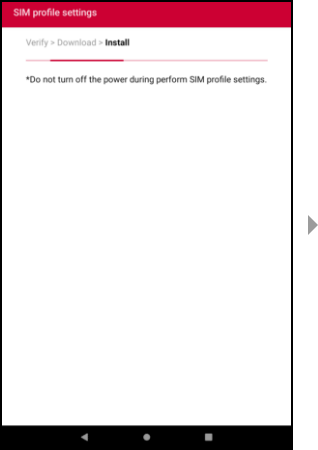
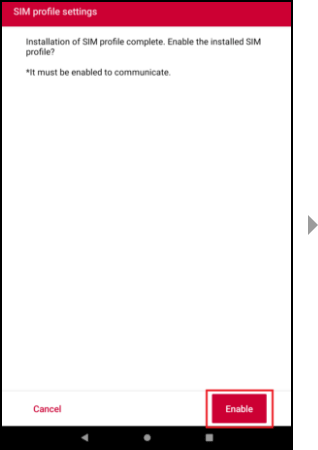
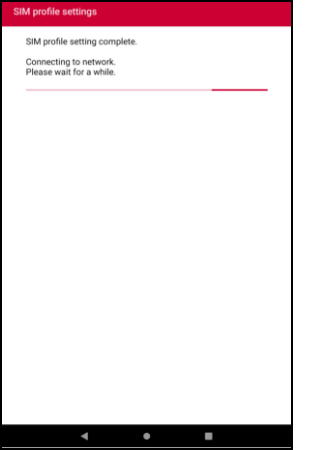
Check the EID label on the side of the box that contained the device and enter the last 4 digits of the EID. If entered correctly, the SIM profile will be downloaded and installed from the server. After installation, tap "Enable" to complete the activation.
- Do not remove the docomo eSIM card or turn off the power while setting up.
- Click
 here[PDF format:571KB](in Japanese only) for how to check EID on dtab d-51C.
Setting up on iPhone/iPad
The following is a setup guide for iPhone and iPad.
Click here (in Japanese only) to learn more about using the eSIM Quick Transfer feature.
eSIM Carrier Activation
For iPhone that support eSIM Carrier Activation, an eSIM activation push notification will be sent to your device after the eSIM activation procedure. There is no need to scan the QR code on your device, and you can easily complete the activation from the push notification (activation by scanning the QR code is also possible after receiving the push notification).
The push notification will be received approximately 1-2 minutes after the eSIM activation procedure. If you do not receive the eSIM activation push notification, or if your iPhone does not support eSIM Carrier Activation, please activate it by scanning the QR code.
(1) Go to "Settings" > "Wi-Fi," turn on "Wi-Fi," select the desired network, enter the password, and tap "Join."
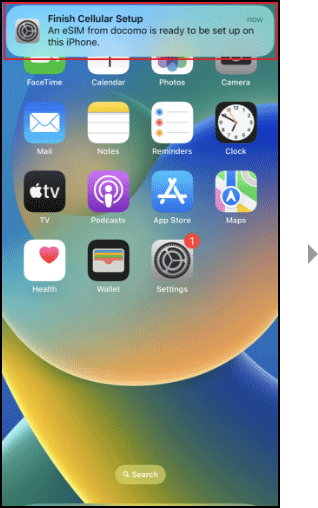
(2) Tap the "Finish Cellular Setup" push notification that appears after connecting to Wi-Fi.
- If you cannot tap the push notification, tap "Settings" > "Finish Cellular Setup."
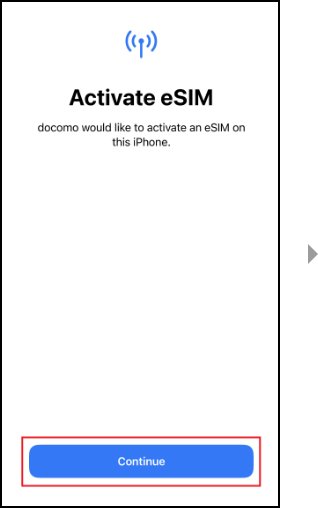
(3) Tap "Continue."
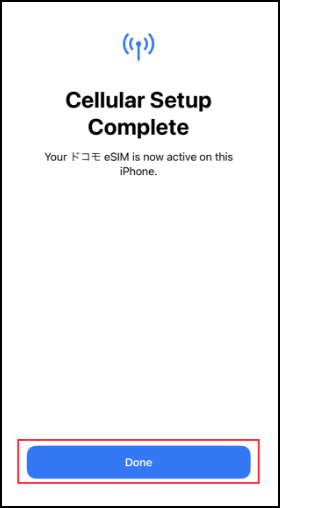
(4) Activation is performed automatically, and the "Cellular Setup Complete" screen appears after completion. After tapping "Done" at the bottom of the screen, the activation is complete.
Activation via Scanning the QR Code
(1) Go to "Settings" > "Wi-Fi," turn on "Wi-Fi," select the desired network, enter the password, and tap "Join."
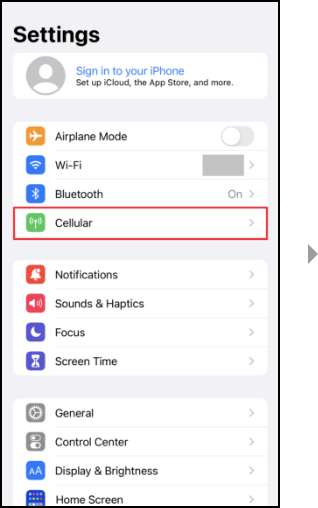
(2) Tap "Settings" > "Cellular."
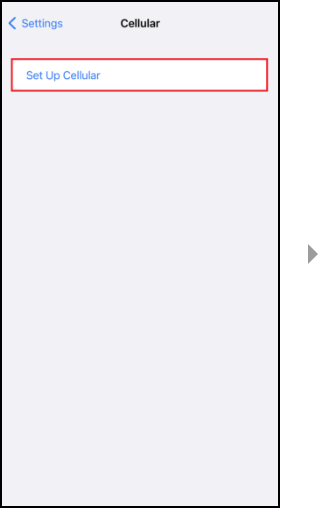
(3) Tap "Set Up Cellular."
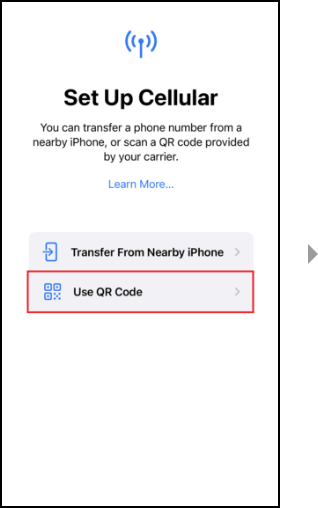
(4) Tap "Use QR Code."
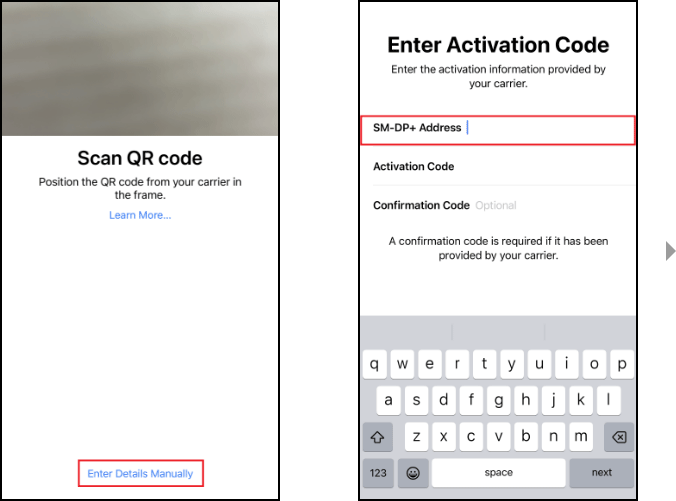
(5) A QR code will appear on the website you are directed to after applying for a contract using your PC or other device beforehand. Scan the QR code with the device you wish to activate, and the eSIM server address will be entered. Alternatively, you can enter the eSIM server address provided on the website directly from the "Enter Details Manually" at the bottom of the screen without scanning the QR code.
- If you enter the address directly, enter it only in the "SM-DP+ Address" field.
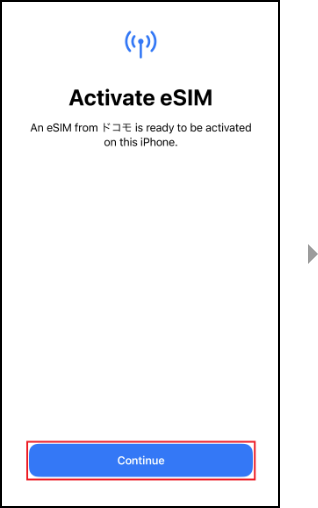
(6) Tap "Continue."
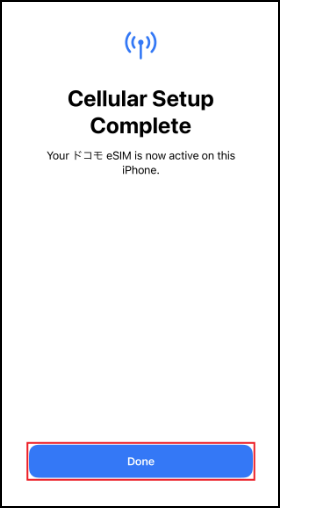
(7)Tap "Done" at the bottom of the screen to complete the activation.

(5) A QR code will appear on the website you are directed to after applying for a contract using your PC or other device beforehand. Scan the QR code with the device you wish to activate, and the eSIM server address will be entered. Alternatively, you can enter the eSIM server address provided on the website directly from the "Enter Details Manually" at the bottom of the screen without scanning the QR code.
- If you enter the address directly, enter it only in the "SM-DP+ Address" field.

(6) Tap "Continue."

(7)Tap "Done" at the bottom of the screen to complete the activation.
Setting up on Android Smartphones
The following is a setup guide for Android smartphones.
(1) Go to "Settings" > "Network & internet" > turn on "Wi-Fi," select the desired Wi-Fi network, enter the password, and tap "Connect."
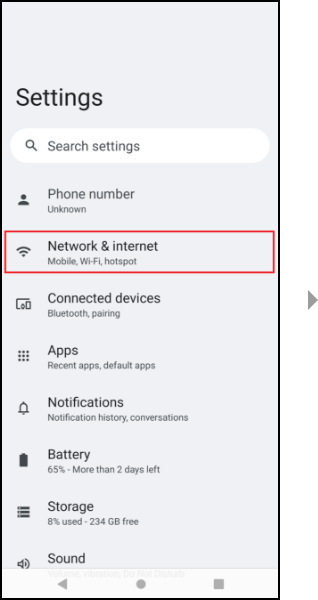
(2) Tap "Settings" > "Network & internet."
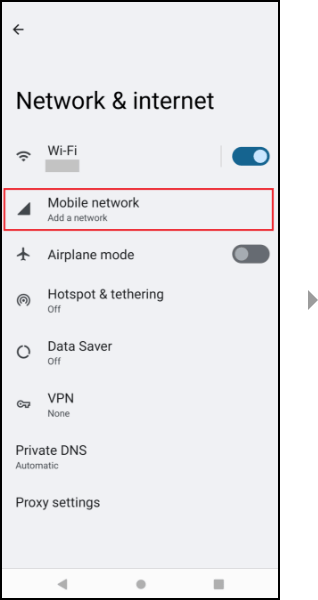
(3) Tap "Mobile network."
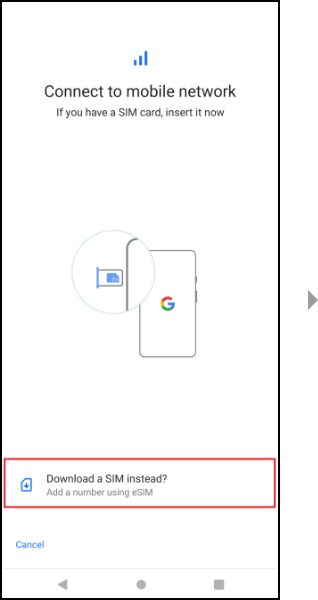
(4) Tap "Download a SIM instead?"
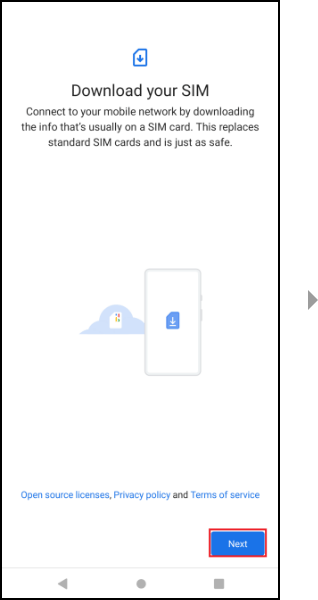
(5) Tap "Next."
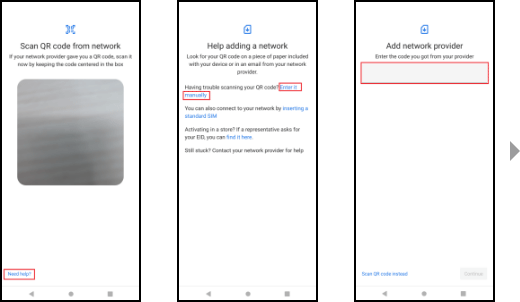
(6) A QR code will be displayed on the website that you will be directed to after applying for a contract beforehand by PC or other means. Scan the QR code with the device you wish to activate, and the eSIM server address will be entered. Alternatively, you can enter the eSIM server address provided on the website directly from "Need help?" > "Enter it manually" at the bottom of the screen without scanning the QR code.
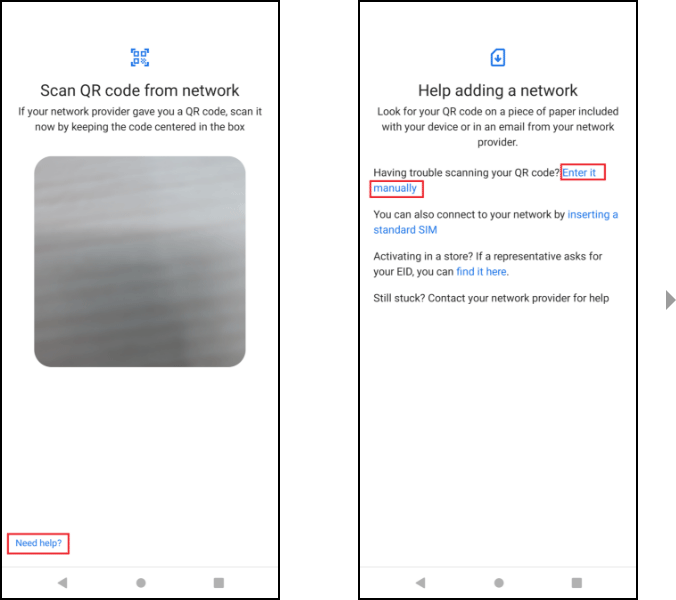
(6) A QR code will be displayed on the website that you will be directed to after applying for a contract beforehand by PC or other means. Scan the QR code with the device you wish to activate, and the eSIM server address will be entered.
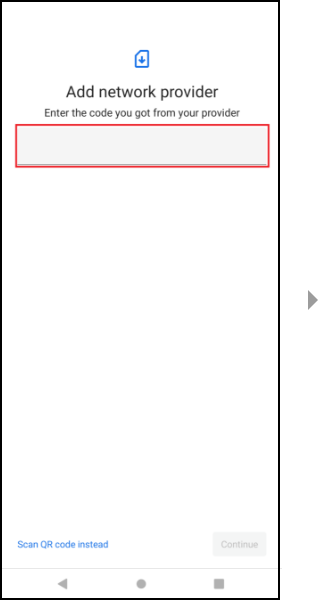
Alternatively, you can enter the eSIM server address provided on the website directly from "Need help?" > "Enter it manually" at the bottom of the screen without scanning the QR code.
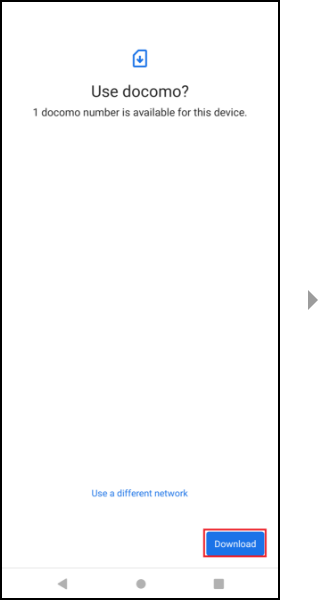
(7) Tap "Download."
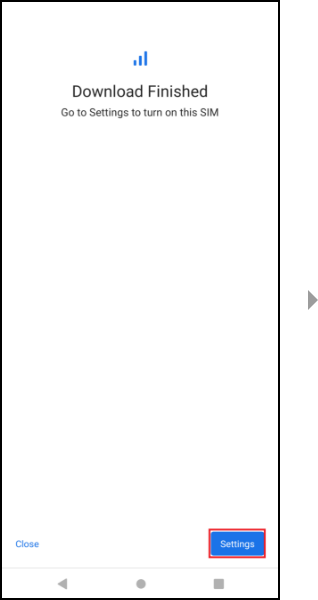
(8) After the download is complete, tap "Settings."
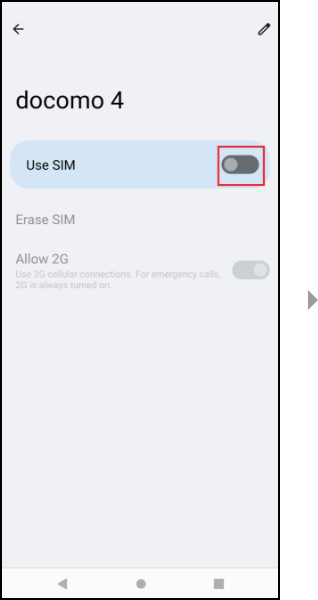
(9) Turn on "Use SIM."
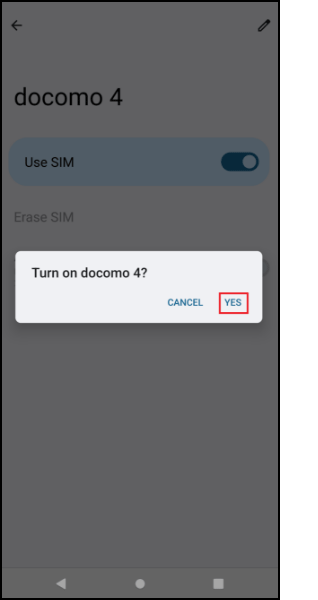
(10) Tap "YES" to complete the activation.
Notes
- Packet communication fees may apply when setting up additional SIM profile on a currently contracted line.
- Connection to d Wi-Fi (SSID 0001docomo) is not available on the initial Wi-Fi settings screen.
It will be available after the SIM profile setting is completed.
If the connection does not work, please turn Wi-Fi on and off. - If the SIM profile is not set up to be valid, mobile data and some apps will not be available.
- The line contract will not be canceled even if the docomo eSIM card/eSIM is initialized from the SIM profile setup app.
If you accidentally initialize the docomo eSIM card/eSIM, you will need to reissue the SIM profile (*1). - Do not use a docomo eSIM card other than compatible models.
It will not be covered by the warranty. - The eSIM cannot be removed from the device.
- Do not turn off the power while setting the SIM profile.
Also, make sure that the battery is charged before setting the SIM profile, as in some cases it may not be set up correctly. - If the SIM profilesetting is completed late at night (11:30 PM to 8:30 AM the following morning), packet communication service may not be available immediately.
In such cases, please try after 8:30 AM. - If the server is down, the SIM profilesetting is not available.
Please try again after a while.
(Server maintenance time [scheduled]: 11:00 PM to 7:00 AM the following morning) - If you wish to cancel your contract to transfer or sell your eSIM-compatible device, make sure to download and initialize the SIM profile before you cancel.
- If you cancel your contract while the SIM profile settings are incomplete, your phone number may appear on the canceled device.
- handling fee of 3,850 yen (incl. tax) may be charged for reissuing SIM profile.
List of Compatible Models
eSIM Compatible Models
[docomo eSIM card compatible models]
- dtab Compact d-01J
- dtab d-01K
- dtab Compact d-02K
[eSIM compatible models]
- Kids' Keitai KY-41C
- Kids' Keitai SH-03M
- DOCOMO Drive Recorder DDR01
- dtab Compact d-52C
- dtab d-51C
- dtab Compact d-42A
eSIM/nano SIM Compatible Models*
[iPhone/iPad]
- iPhone 15 Pro, iPhone 15 Pro Max, iPhone 15, iPhone 15 Plus
- iPhone 14 Pro, iPhone 14 Pro Max, iPhone 14, iPhone 14 Plus
- iPhone 13 Pro, iPhone 13 Pro Max, iPhone 13, iPhone 13 mini
- iPhone 12 Pro, iPhone 12 Pro Max, iPhone 12, iPhone 12 mini
- iPhone SE (2nd and 3rd generation)
- iPhone 11 Pro, iPhone 11 Pro Max, iPhone 11
- iPhone XS, iPhone XS Max, iPhone XR
- 11-inch iPad Pro (1st, 2nd, 3rd, and 4th generation)
- 12.9-inch iPad Pro (3rd, 4th, 5th, and 6th generation)
- iPad Air (3rd, 4th, and 5th generation)
- iPad (7th, 8th, 9th, and 10th generation)
- iPad mini (5th and 6th generation)
[Android Smartphone]
- Google Pixel 8 Pro
- Google Pixel 8
- Google Pixel Fold
- Google Pixel 7a
- Galaxy Z Flip5 SC-54D
- Galaxy Z Fold5 SC-55D
- Galaxy S23 SC-51D
- Galaxy S23 Ultra SC-52D
- Galaxy A54 5G SC-53D
- Galaxy Z Flip4 SC-54C
- Galaxy Z Fold4 SC-55C
- Galaxy A23 5G SC-56C
- Xperia 5 V SO-53D
- Xperia 1 V SO-51D
- Xperia 10 V SO-52D
- Xperia 5 IV SO-54C
- Xperia 1 IV SO-51C
- AQUOS sense8 SH-54D
- AQUOS R8 pro SH-51D
- AQUOS R8 SH-52D
- AQUOS wish3 SH-53D
- AQUOS sense7 SH-53C
- AQUOS R7 SH-52C
- arrows N F-51C
- DuraForce EX KY-51D
- Regarding the dual SIM funtcion (function to use multiple lines with a nano SIM and an eSIM simultaneously, or to use multiple lines with an eSIM simultaneously), we have confirmed that voice calls, SMS, data communication, and emergency calls can be used on DOCOMO lines. Operation on lines other than DOCOMO lines has not been tested.
- Wi-Fi is a trademark or registered trademark of the Wi-Fi Alliance.
- Apple, the Apple Logo, AirPlay, AirPods, Apple Music, Apple Pay, Apple Pencil, Apple TV, Apple Watch, Ceramic Shield, Dynamic Island, Face ID, FaceTime, iBooks, iPad, iPhone, iTunes, Lightning, Magic Keyboard, MagSafe, ProMotion, Siri, Touch ID, TrueDepth, True Tone are trademarks of Apple Inc., registered in the U.S. and other countries. The iPhone trademark is used under license from AiPhone Co., Ltd. App Store, Apple Arcade, AppleCare+, Apple TV+, iCloud are service marks of Apple Inc., registered in the U.S. and other countries. TM and © 2024 Apple Inc. All rights reserved.
- "Xperia" is a trademark or registered trademark of Sony Mobile Communications Inc.
- "Galaxy" is a trademark or registered trademark of Samsung Electronics Co., Ltd.
- The "AQUOS," "AQUOS" logo, and "AQUOS sense" logo are registered trademarks of SHARP CORPORATION.
- "Google Pixel" is a trademark of Google LLC.
- "Kids' Keitai" is a trademark or registered trademark of NTT DOCOMO, INC.
-
In order to view PDF files, you must have the
 Adobe® Reader® plug-in offered free of charge from Adobe Systems, Inc. When viewing the PDF files with Adobe® Acrobat®, use version 10 or later.


